Getting Started
Now that puerts is installed and your TypeScript development environment has been setup, its time to get started!
Puerts has two main execution modes, both of which can coexist in isolation.
Table Of Contents
Automatic Binding Mode (More Info)
Puerts allows users to define and extend Unreal Engine classes inside of TypeScript.
Through a self-starting virtual machine, launched by PuertsModule, automatic binding mode supports features such as:
- Automatic blueprint class generation
- Incremental code compilation
- Hot-reload
Setup
To get started, execute the following NodeJS command inside of the puerts plugin directory. (YourProject/Plugins/Puerts)
This will install all relevant dependencies and update any configuration files required for automatic binding to function.
node enable_puerts_module.js
Note: NodeJS must be installed to execute the above command
Usage
Create a new TypeScript file and define a new class that extends your desired object (e.g ACharacter, AActor, e.t.c)
Supported features are as follows:
- Constructor definition
- Overriding blueprint events and functions
- Input axis mapping
- Action events (e.g BeginPlay, Tick)
- RPC functions (Requires
experimentalDecorators)
TypeScript
// YourProject/TypeScript/TS_Player

import * as UE from 'ue'

class TS_Player extends UE.Character {
    Constructor() {
        //...
    }

    ReceiveBeginPlay(): void {
        //...
    }
    ReceiveTick(InDeltaSeconds: number): void {
        //...
    }
    //...
}

export default TS_Player;
Now it should be available inside of Unreal Engine!
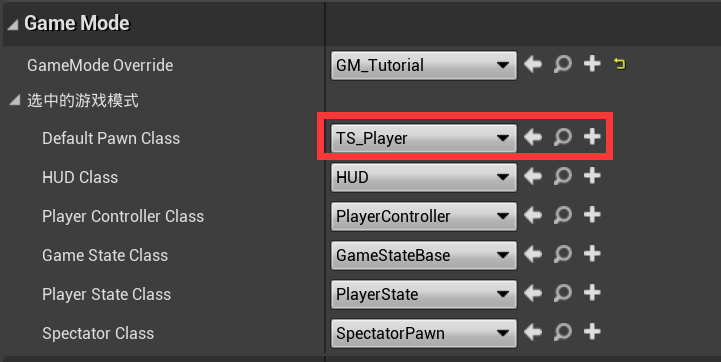
Note: The file name, class name and default export all need to match for it to be registered with Unreal Engine. (See Format)
Starting A New JavaScript Virtual Machine (More Info)
Starting your own virtual machine is essential for executing traditional JavaScript code within puerts.
Example use cases include:
- Executing a one-time script (e.g Printing 'Hello World!')
- Starting an entry point for a complex event loop (Similar to a
mainfunction)
Usage
To start a new JavaScript virtual environment, a suitable entry point should be identified.
Example 1 - One-Time Script
C++
#include "JsEnv.h"

UCLASS()
class APlayerCharacter : public ACharacter
{
    GENERATED_BODY()

public:
    virtual void BeginPlay() override {
        auto JsEnv = MakeShared<puerts::FJsEnv>();

        JsEnv->Start("PrintHelloWorld.js");
    }
};
TypeScript
// YourProject/TypeScript/PrintHelloWorld.ts

console.warn("Hello World!");
Example 2 - Example Event Loop Entry Point
C++
#pragma once

#include "CoreMinimal.h"
#include "Engine/GameInstance.h"
#include "JsEnv.h"
#include "DemoGameInstance.generated.h"

UCLASS()
class UDemoGameInstance : public UGameInstance
{
    GENERATED_BODY()

public:
    virtual void OnStart() override {
        Super::OnStart();
        JsEnv = MakeShared<puerts::FJsEnv>();

        JsEnv->Start("Entry.js",
        {
            TPair<FString, UObject*>("GameInstance", this)
        });
    }

    virtual void Shutdown() override {
        Super::Shutdown();
        JsEnv.Reset();
    }

protected:
    TSharedPtr<puerts::FJsEnv> JsEnv;
};
TypeScript
// YourProject/TypeScript/Entry.ts

import * as UE from 'ue'
import { argv } from "puerts";

const GameInstance = argv.getByName("GameInstance") as UE.GameInstance;

console.warn("JavaScript Entry Point Started!");
//...
Note: If multiple virtual machines are started, these virtual machines are isolated from each other and do not share the same memory scope. (See JavaScript Environment)
User Manual
Now that things are all setup and fully functional, its time to familiarise yourself with everything else puerts has to offer.